graph TD;
    A[Raspberry Pi 5] -->|Hosts| B[Ubuntu Server];
    B --> C[SSH for Remote Access];
    B -->|Web Server| D[NGINX];
    D --> E[UFW Firewall];
    D -->|SSL Encryption| F[SSL Certificates];
    B -->|Publishing & Presentation| G[Quarto];
    G -->|Content Editing| H[Visual Studio Code];
    G -->|Version Control| I[Git with GitHub];
    H -->|Remote Development| J[VS Code Remote Development Extension];

    style A fill:#f9f,stroke:#333,stroke-width:2px
    style B fill:#fcf,stroke:#333,stroke-width:2px
    style C fill:#cff,stroke:#333,stroke-width:2px
    style D fill:#fcf,stroke:#333,stroke-width:2px
    style E fill:#cff,stroke:#333,stroke-width:2px
    style F fill:#fcf,stroke:#333,stroke-width:2px
    style G fill:#cff,stroke:#333,stroke-width:2px
    style H fill:#fcf,stroke:#333,stroke-width:2px
    style I fill:#cff,stroke:#333,stroke-width:2px
    style J fill:#fcf,stroke:#333,stroke-width:2px
Building a Data Science Server on Raspberry Pi
Executive Summary
This project decribes the process I followed to create a self-hosted web server to host my data science portfolio. This website was made with ❤️ using Quarto on a Raspberry Pi 5 hosted with Ubuntu Server and NGINX
A web portfolio is essential for presenting data science projects, but web hosting can be expensive, and self-hosting your own web site can be technically challenging. To make the data science project lifecycle more accessible and affordable, I spent a day creating my own web server and website using freely available and open source tools. This technology stack allows my data science workflow to be automated, efficient, and cost-saving, as well as accessible for non-technical stakeholders.
This tutorial provides a step-by-step walkthrough of the process I used when setting up my portfolio website on a Raspberry Pi. I used Ubuntu Server to make the server, NGINX to make the web server, UFW for the firewall, SSL for security certificate, and Quarto for publishing, alongside Visual Studio Code for remote development and git with GitHub for version control.
The tutorial demonstrates my ability to build and describe the beginning-to-end workflow of creating a technology stack suitable for full-stack data science, which is automated and reproducible. The process started with creating a local server, and culminated in the publishing of my website, which describes the whole process.
The tutorial assumes you have basic computing skills, including using the Linux command line or terminal with the bash shell, and understand the basic steps of setting up a server. You should be able to follow the tutorial with just some basic knowledge and willingness to engage in a process of trial-and-error testing!
Problem Statement
Background
In today’s digital era, businesses are increasingly dependent on effective online presence and streamlined workflows. A well-structured and accessible data science portfolio is pivotal for showcasing technical prowess and attracting potential clients or collaborators. However, the challenge lies in setting up an efficient, cost-effective, and scalable web solution that aligns with the technical nature of data science.
Objective
The primary objective of this project is to develop a self-hosted, full-stack data science portfolio website using a Raspberry Pi. This solution aims to provide a low-cost, yet robust platform for displaying my data science capabilities, projects, and achievements. By leveraging open-source tools and a compact hardware setup, the project seeks to optimize resource utilization while ensuring high performance and security.
Business Justification
- Cost-Effectiveness: Utilizing a Raspberry Pi for server hosting significantly reduces the overhead costs associated with traditional web hosting services.
- Customization and Control: Self-hosting allows for greater customization and control over the website’s content, layout, and functionality, tailored to specific business needs.
- Showcasing Technical Expertise: A self-curated data science portfolio website serves as a testament to my technical skills and innovative approach, enhancing credibility and appeal in a competitive market.
- Enhanced Security: By managing the server in-house, I can implement robust security measures tailored to my specific requirements, reducing reliance on third-party providers.
- Scalability and Flexibility: The use of open-source tools offers flexibility in scaling the website and integrating additional features or analytics as per business growth.
Technical Justification
Raspberry Pi 5: Offers a compact, energy-efficient, and cost-effective solution for hosting a web server. Its performance capabilities are sufficient for running a full-stack data science portfolio website.
Ubuntu Server: A free, open-source operating system that is widely recognized for its stability and security, making it ideal for server environments.
NGINX: Known for its high performance, stability, and low resource consumption, NGINX is well-suited for handling web traffic on a Raspberry Pi.
UFW (Uncomplicated Firewall): Provides an intuitive way to manage firewall settings, enhancing the security of the server.
SSL Certificates: Essential for encrypting data and ensuring secure communication between the server and its clients, thereby protecting sensitive information.
Quarto: As an open-source publishing system, Quarto allows for the creation of dynamic and interactive data science content, vital for a data science portfolio.
Visual Studio Code: This versatile code editor offers extensive features for software development, including remote development capabilities, making it ideal for managing and updating website content.
Git with GitHub: Enables version control and collaborative development, ensuring efficient management and tracking of changes in the website’s codebase.
SSH (Secure Shell): Ensures secure remote access to the server, an essential feature for maintaining and updating the website.
In conclusion, this project aims to leverage the synergy of these open-source tools to create a scalable, secure, and efficient data science portfolio website, tailored to meet business needs in showcasing technical expertise and enhancing online presence.
System Information
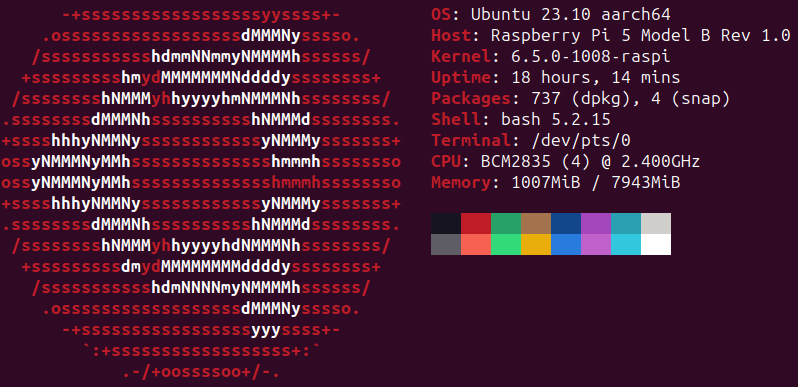
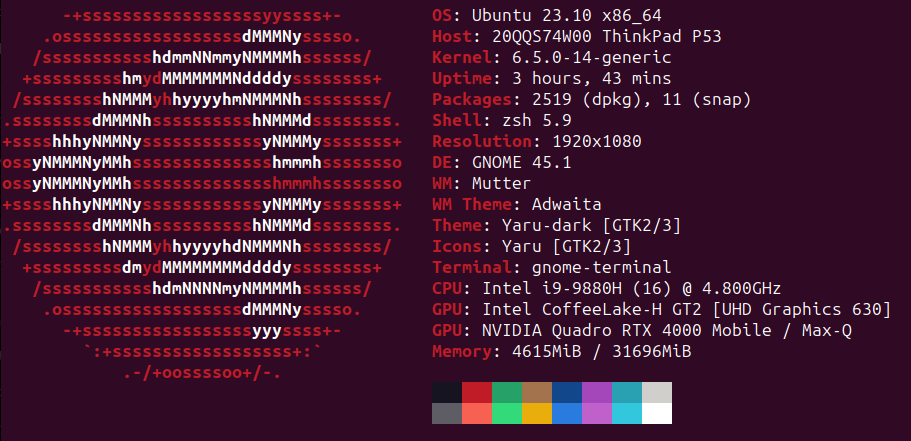
I’m using a Raspberry Pi 5 as my ‘headless’ home server - i.e., without a monitor or keyboard or mouse - connected directly to the router via an ethernet cable, and a Lenovo ThinkPad P53 as my laptop to interface with the server.

Image Source: Raspberry Pi Foundation
System Information with Neofetch
Let’s start off by displaying the system information for the Raspberry Pi and ThinkPad systems I am using.
Neofetch is a command-line system information tool that displays your system’s information in an aesthetically pleasing way. Here’s how to install and run Neofetch on both Ubuntu and Raspberry Pi.
Neofetch Installation
Neofetch can be easily installed from the official repositories.
sudo apt update
sudo apt install neofetch
To run neofetch, simply:
neofetchHere’s the output of neofetch on my Raspberry Pi and ThinkPad:
Tools and Software Used
- Raspberry Pi: A small and affordable computer that you can use to learn programming. Visit Raspberry Pi
- Ubuntu Server: A free and open-source operating system that’s perfect for servers. Visit Ubuntu Server
- SSH (Secure Shell): A cryptographic network protocol for secure data communication, remote command-line login, remote command execution, and other secure network services between two networked computers. Learn about SSH
- NGINX: A high-performance web server, known for its stability and simple configuration. Visit NGINX
- UFW (Uncomplicated Firewall): An easy-to-use interface for managing firewall rules on Ubuntu. Visit UFW
- SSL Certificates: Essential for website security, providing secure, encrypted communications. Learn about public key certificates
- Quarto: An open-source scientific and technical publishing system built on Pandoc. Visit Quarto
- Visual Studio Code: A lightweight but powerful source code editor which runs on your desktop. Visit Visual Studio Code
- Remote Development for VS Code: Allows you to use VS Code on your local machine to develop on remote machines. Learn about Remote Development
- Git: A distributed version control system to track changes in source code during software development. Visit Git
- GitHub: A platform for hosting and collaborating on Git repositories. Visit GitHub
Step-by-Step Technical Walkthrough
Installing Ubuntu Server on Raspberry Pi
Here’s a short guide with the necessary steps to install Ubuntu Server on a Raspberry Pi in a headless setup using a desktop or laptop computer on the same network as the Raspberry Pi, with SSH:
- Flash Ubuntu Server on Raspberry Pi:
- Download the Raspberry Pi Imager from the Raspberry Pi website on your desktop or laptop computer.
- Insert the microSD card into your computer.
- Use Raspberry Pi Imager to flash Ubuntu Server onto the microSD card.
- Initial Raspberry Pi Setup:
- Insert the flashed microSD card into your Raspberry Pi.
- Connect the Raspberry Pi to your network via Ethernet.
- Power up your Raspberry Pi without connecting it to a monitor or keyboard.
- SSH into Raspberry Pi:
- Determine the Raspberry Pi’s IP address from your router’s DHCP lease table.
- SSH into your Raspberry Pi from your ThinkPad using the IP address.
# Replace 'raspberry_pi_ip' with the actual IP address of your Raspberry Pi
ssh ubuntu@raspberry_pi_ip
Update and Upgrade Ubuntu Server
Once logged in, update and upgrade the system.
sudo apt update
sudo apt upgrade
Checking Raspberry Pi Health
Verify the Raspberry Pi is running and its hardware is functioning correctly:
# Check CPU load
top

# Check memory usage
free -h

# Check disk space usage
df -h

# Check the Raspberry Pi model and Ubuntu version:
cat /proc/device-tree/model
lsb_release -a
Verify Network Configuration
# Display network interfaces and IP addresses
ip addr show

# Test internet connectivity
ping -c 4 google.com
Check Network and IP Addresses
Identify the local and public IP addresses of the Raspberry Pi. You will need these later! Make a note of them.
ip addr show
curl ifconfig.me/ip
Now we’ve setup a Raspberry Pi running Ubuntu Server, which you can access and control using SSH from your desktop or laptop computer.
Buy Domain and Setup SSL Certificate
I bought the domain name carecodeconnect.io and setup a subdomain portfolio.carecodeconnect.io with Namecheap and configured an SSL certificate, which ensures the security of the website. This process involves purchasing a domain, obtaining an SSL certificate, and concatenating the CRT files for SSL setup.
1. Visit Namecheap
- Go to Namecheap and search for your desired domain name.
- Choose the domain you want and proceed to purchase it.
- Complete the checkout process by creating an account and making the payment.
2. Purchase SSL Certificate
- After purchasing your domain, you can buy an SSL certificate from Namecheap.
- Look for options like PositiveSSL under the SSL certificate section.
- Complete the purchase and go through the process of domain validation.
3. Concatenating the CRT Files
After receiving your SSL certificate files, concatenate them for proper setup on your server.
- Download the SSL certificate files (usually a
.zipfile) to your server. - Extract the files:
unzip your_site.zip- Concatenate the domain certificate file and the CA bundle file into a single file:
cat your_site.crt your_site.ca-bundle > combined_your_site.crtThis creates a single combined CRT file that can be used in your web server configuration later.
Setting Up Web Server
When choosing the best web server solution, I chose between Apache and NGINX, which are both popular web servers. Apache, known for its robustness and flexibility, has a wide range of modules that allow for extensive configuration and customization. For a Raspberry Pi 5, which has limited resources compared to full-scale servers, NGINX is often the more suitable choice. Its low memory footprint and ability to handle numerous simultaneous connections without significant resource consumption align well with the hardware constraints of the Raspberry Pi.
1. Setting Up NGINX and UFW Firewall
Install and start NGINX, and then set up UFW to allow necessary traffic:
sudo apt install nginx
sudo systemctl start nginx
sudo systemctl status nginx

sudo ufw allow ssh
sudo ufw enable
sudo ufw allow http
sudo ufw allow https
sudo ufw allow 'Nginx Full'
sudo ufw status verbose
2. SSL Certificate Configuration
Generate an SSL certificate for the website:
openssl req -new -newkey rsa:2048 -nodes -keyout your_site.key -out your_site.csr
sudo mv your_site.key /etc/ssl/private/
sudo chmod 600 /etc/ssl/private/your_site.key
sudo mkdir /etc/ssl/csr/
sudo mv your_site.csr /etc/ssl/csr/
3. SSL Certificate Configuration
After generating the CSR, you’ll need to submit it to a Certificate Authority to obtain an SSL certificate. Once you have your SSL certificate (your_site.crt), install it along with the key:
sudo mv your_site.crt /etc/ssl/
sudo chmod 600 /etc/ssl/private/your_site.key
4. NGINX Configuration
Configure NGINX to serve your Quarto website and enable SSL:
sudo nano /etc/nginx/sites-available/portfolioThe NGINX configuration file should look something like this:
server {
    listen 80;
    listen [::]:80;
    listen 443 ssl;
    listen [::]:443 ssl;
    ssl_certificate /etc/ssl/your_site.crt;
    ssl_certificate_key /etc/ssl/private/your_site.key;
    # ... additional SSL configurations ...
    server_name your_site;
    root /var/www/portfolio/_site;
    index index.html index.htm;
    location / {
        try_files $uri $uri/ =404;
    }
}
5. Test NGINX
# Test NGINX configuration for syntax errors
sudo nginx -t
6. DNS Configuration
Ensure your domain’s DNS settings have A and AAAA records pointing to your Raspberry Pi’s public IP addresses:
A Record for local_ip
AAAA Record for public_ip
Setting Up Website Development and Publishing Tools
Quarto is a scientific and technical publishing system that allows you to create dynamic documents, presentations, and websites. It supports multiple programming languages, including Python, R, and Julia, enabling the integration of code and its output (like plots and tables) directly into the content.
I decided to use Quarto as my web publishing system because it is a highly suitable and powerful tool for data science publishing, especially when compared to traditional static site generators like Hugo. One of the key strengths of Quarto lies in its native support for Jupyter notebooks and Python, which are cornerstone technologies in the data science and machine learning communities. This integration allows data scientists to directly embed code, results, and visualizations from Python or Jupyter notebooks into their web content, ensuring that the published material is not only informative but also interactive and dynamically up-to-date.
Quarto is particularly useful for creating rich, interactive documents where the narrative is supported by data and visualizations. It also excels in generating static content like reports, articles, presentations, and blogs where reproducibility and presentation of data are key.
Additionally, Quarto’s Markdown-based syntax simplifies the process of content creation, making it more accessible to users who may not have extensive web development experience. This ease of use, combined with its powerful features for data visualization and analysis, positions Quarto as a superior choice for building a data science or machine learning website. It not only facilitates effective communication of complex data-driven insights but also enhances the overall user engagement through interactive content, which is a significant advantage over Hugo for data science applications.
Setting up Quarto
1. Installing Quarto
Install Quarto and create a new project for the portfolio website:
sudo wget https://github.com/quarto-dev/quarto-cli/releases/download/v1.3.450/quarto-1.3.450-linux-arm64.deb
sudo dpkg -i quarto-1.3.450-linux-arm64.deb
quarto --version
cd /var/www
sudo quarto create project website portfolio
cd /var/www/portfolio
quarto render
To set up a basic Quarto portfolio website using the Cerulean Bootswatch theme, used for this portfolio, follow these steps. At the time of writing, Bootswatch offers 26 different themes. This guide assumes you will use the Cerulean theme and have Quarto installed and a basic understanding of its usage.
2. Create a New Quarto Project
Create a new Quarto project in your desired directory:
# Navigate to your desired directory
cd path/to/your/directory

# Create a new Quarto project
quarto create project portfolio
3. Configuring NGINX for Quarto Website
Update NGINX configuration to serve the Quarto website:
sudo nano /etc/nginx/sites-available/portfolio
# Add the server block configuration here
sudo ln -s /etc/nginx/sites-available/portfolio /etc/nginx/sites-enabled/
sudo nginx -t
sudo systemctl restart nginx
4. Set Up the Quarto Configuration
In the _quarto.yml file, set up your website configuration. I’m using the Cerulean bootswatch theme.
project:
  type: website

website:
  title: "Portfolio"
  navbar:
    right:
      - href: index.qmd
        text: Home
      - href: about.qmd
        text: About
      - href: projects.qmd
        text: Projects

format:
  html:
    theme: cerulean
    css: css/styles.css
    toc: false
5. Create Content Files
Create your main content files, such as index.qmd, about.qmd, and projects.qmd. Here’s an example for index.qmd:
---
title: "Portfolio"
format:
    html:
        code-fold: true
---

Your text here.
And for projects.qmd:
---
title: "Projects"
page-layout: full
title-block-banner: true
---

# My Projects

Your text here.

## [Project 1 Title](projects/project1.qmd)
Brief description of Project 1.
6. Add Project Details
For each project, create a .qmd file in the projects directory. For example, project1.qmd:
---
title: "Project 1 Title"
---

# Project 1

[Details about Project 1]
Repeat this for each project.
7. Render Your Website
Finally, render your website:
quarto renderThis will generate your website with the Cerulean Bootswatch theme. You can then view it locally or deploy it to a web server.
Version Control with Git and GitHub
Initialize a Git repository and push the website code to GitHub:
git init
git add .
git commit -m "Initial commit"
git remote add origin https://github.com/your_username/portfolio.git
git push -u origin main
git status
Automating Website Publishing
I’ve automated the process of publishing my website. This involves updating with git/GitHub, rendering with Quarto, and restarting the NGINX server. This is how I did it:
1. Create a Bash Script
- Use a text editor such as
nanoto create a Bash script (e.g.,sudo nano publish_website.sh) using the following guide. - Modify the paths in the script according to your project and server setup.
- Replace
user_namewith your user name andrepo_namewith your GitHub repository name.
The following script:
- Navigates to your Quarto project directory.
- It adds, commits, and pushes changes to your Git repository.
- Quarto builds the website.
- The built website is synced to the NGINX directory.
- NGINX is reloaded to reflect the changes.
#!/bin/bash

# Navigate to the Quarto project directory
cd /home/user_name/projects/portfolio

# Add all new and changed files to Git
echo "Adding changes to Git..."
git add .

# Commit the changes with a standard message. You can modify this to be more descriptive
echo "Committing changes..."
git commit -m "Update website content"

# Push the changes to GitHub
echo "Pushing changes to GitHub..."
git push repo_name main

# Build the Quarto project
echo "Building the Quarto website..."
quarto render

# Sync the build output to the NGINX directory
echo "Syncing files to the NGINX directory..."
sudo rsync -av --delete /home/user_name/projects/portfolio/_site/ /var/www/portfolio/

# Restart NGINX server
sudo systemctl reload nginx

echo "Website published successfully."
2. Making the Script Executable
- To make the script executable, run the following command:
chmod +x publish_website.sh3. Run the Script
- Execute the script to automate the process of updating and publishing your website.
./publish_website.shThis setup provides a convenient way to regularly update and publish your Quarto website with minimal manual intervention.
Version Control With git using ssh
Once the workflow is working, to streamline the process, I updated my git/GitHub repository using SSH from the command line. This means you do not need to input your git username and password (key) each time you push your changes to GitHub.
To do this, I needed to set up SSH keys, associate them with my GitHub account, and then use Git commands to push my changes. Here’s a brief summary of the steps:
1. Generate SSH Key Pair
Open your terminal and generate a new SSH key pair (if you haven’t already):
ssh-keygen -t rsa -b 4096 -C "your_email@example.com"
# Follow the prompts to specify the file in which to save the key.
Replace "your_email@example.com" with your email associated with your GitHub account. Press Enter to accept the default file location and name.
2. Add SSH Key to SSH-Agent
Start the SSH agent and add your SSH key:
# Start the SSH agent
eval "$(ssh-agent -s)"

# Add SSH key to the SSH agent
ssh-add ~/.ssh/id_rsa
If you saved your key to a different location, replace ~/.ssh/id_rsa with your key’s path.
3. Add SSH Key to GitHub Account
Copy the SSH key to your clipboard:
cat ~/.ssh/id_rsa.pub | clipLogin to GitHub, and in the upper-right corner, click your profile photo, then click Settings.
In the user settings sidebar, click SSH and GPG keys.
Click New SSH key or Add SSH key.
In the “Title” field, add a descriptive label for the new key, paste your key into the “Key” field.
Click Add SSH key.
4. Change Git Remote URL to SSH
Change your repository’s remote URL from HTTPS to SSH:
# Change to your repository's directory
cd /path/to/your/repository

# Set the remote URL to SSH
git remote set-url origin git@github.com:username/repository.git
Replace username/repository.git with your GitHub username and repository name.
5. Push Changes Using SSH
After making your changes, add, commit, and push them using Git:
# Add changes to staging
git add .

# Commit changes
git commit -m "Your commit message"

# Push changes to GitHub
git push origin main
This will use SSH for authentication, ensuring secure communication with GitHub. You can verify that SSH is being used by running git remote -v, which should show the SSH URL for origin.
Develop Your Website With An Integrated Development Environment
Building a website from the command line using SSH on a local server can be a bit tricky and slow, especially if you are not used to working with the Bash shell in the terminal.
To more easily develop my portfolio and preview my website as I build it, I configured Visual Studio Code - a popular code editor and Integrated Development Environment for data science - on my Thinkpad to interface with the Raspberry Pi server.
To install Visual Studio Code on Ubuntu and set it up for remote development with a Raspberry Pi via SSH, follow these steps:
Installing Visual Studio Code on Ubuntu
Update Package List: Open a terminal and update your package list:
sudo apt updateInstall VS Code: You can install VS Code from the Ubuntu Software Center or via the command line. To install via command line, use:
sudo apt install codeAlternatively, you can download the
.debpackage from the VS Code website and install it using:sudo dpkg -i <path-to-downloaded-deb-file>
Setting Up Remote Development
- Install Remote Development Extension in VS Code:
- Launch VS Code.
- Go to the Extensions view by clicking on the square icon on the sidebar, or press
Ctrl+Shift+X. - Search for “Remote Development” and install the extension pack by Microsoft.
- Setting Up SSH Keys for Raspberry Pi (if not already done):
On your Ubuntu machine, open a terminal and create an SSH key pair (skip if you already have one):
ssh-keygen -t rsa -b 4096Copy the public key to your Raspberry Pi:
ssh-copy-id pi@raspberry_pi_ipReplace
pi@raspberry_pi_ipwith the username and IP address of your Raspberry Pi.
- Connecting to Raspberry Pi via SSH in VS Code:
- In VS Code, open the Command Palette (
Ctrl+Shift+P). - Type “Remote-SSH: Connect to Host…” and select it.
- Enter the SSH connection command:
pi@raspberry_pi_ip. - VS Code will connect to the Raspberry Pi. You might be prompted to select the OS type (Linux).
- Once connected, you can open folders, edit files, and use the terminal on the Raspberry Pi remotely.
- In VS Code, open the Command Palette (
- Working Remotely:
- With the remote connection established, you can now work on your Raspberry Pi’s file system directly from VS Code on your Ubuntu machine.
- You can install additional extensions, run scripts, and even debug remotely.
Notes
- Ensure that SSH is enabled on your Raspberry Pi and that it is accessible from your Ubuntu machine.
- The username
piis the default for Raspberry Pi OS; replace it with the appropriate username if you are using a different OS or have changed the default username. - Keep your Raspberry Pi’s IP address handy for remote connections. If it’s on a dynamic IP, consider setting a static IP or using a hostname.
By following these steps, you’ll be able to efficiently develop and manage projects on your Raspberry Pi directly from your Ubuntu machine using VS Code’s powerful remote development capabilities.
Conclusion
In summary, I’ve taken you through a high-level overview of the steps I followed to create my data science portfolio website on a self-hosted server.
First, I installed Ubuntu Server on a Raspberry Pi 5 using SSH. Then, I used NGINX to host a web server, and created an SSL certificate. Finally, I setup Quarto to interface with Visual Studio Code and used the Remote Development extension to publish my portfolio website. To make the project more efficient, I automated the process of publishing the site using bash shell scripting.
This project successfully culminates in a robust and cost-effective solution that underscores my commitment to innovation and technical proficiency. I demonstrated my ability to create a beginning-to-end technology stack suitable for full-stack data science - from building a server to presenting the findings in an accessible portfolio - and my commitment to efficiency in the process.
I did this by showcasing my technical skills:
By strategically harnessing the Raspberry Pi as a self-hosting server platform, the project significantly reduces operational costs associated with traditional web hosting, translating to more efficient allocation of resources.
The utilization of open-source tools like Ubuntu Server, NGINX, and Quarto not only cuts expenses but also offers unparalleled flexibility and customization, allowing me to tailor the website to its unique needs and growth trajectory.
The integration of secure protocols and self-hosting enhances data security, fostering trust and reliability among stakeholders.
Through this project, value is identified and realized by marrying cost-efficiency with high-performance technology. The data science portfolio website, in turn, serves as a dynamic showcase of my capabilities, enhancing my visibility and appeal in a competitive marketplace.
The code to create this website is available on the GitHub repository.
I hope this tutorial helps you to setup your own data science portfolio!